How To Put On Countertops: A Comprehensive Guide
Installing countertops is a significant home improvement project that can dramatically enhance the aesthetics and functionality of a kitchen or bathroom. While professional installation is always an option, understanding the process allows homeowners to make informed decisions and, for those with the appropriate skills and tools, undertake the project themselves. This article provides a comprehensive guide on how to put on countertops, covering essential steps from preparation to final finishing.
Planning and Preparation: The Foundation for Success
Before any physical work commences, meticulous planning is paramount. This stage involves accurate measurements, material selection, and ensuring the existing cabinetry is adequately supported and level. Overlooking details in the planning phase can lead to costly errors and a subpar final result.
The initial step is to take precise measurements of the existing countertop space. It is crucial to measure multiple points along the length and width of the cabinets to account for any irregularities. These measurements form the basis for ordering the new countertop material and ensuring a proper fit. If the countertop includes a sink or cooktop, accurate dimensions and cutout locations are essential. These dimensions should be cross-referenced with the manufacturer's specifications for the chosen appliances.
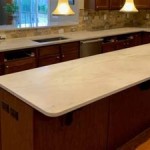
Material selection is a critical decision that impacts both the appearance and durability of the countertop. Common countertop materials include laminate, solid surface (e.g., Corian), quartz, granite, marble, and wood. Each material offers unique characteristics regarding cost, maintenance, heat resistance, scratch resistance, and aesthetic appeal. Careful consideration should be given to the intended use of the countertop and the overall design aesthetic of the room. For example, a busy kitchen may benefit from the durability of quartz or granite, while a bathroom countertop may be well-suited for the more delicate beauty of marble.
Prior to installing the new countertop, the existing cabinetry must be thoroughly inspected and prepared. The cabinets must be level and structurally sound to provide adequate support for the weight of the new countertop. Use a level to check the cabinet surfaces in multiple directions. If any discrepancies are found, shims can be used to bring the cabinets into level. Secure the shims with construction adhesive to prevent them from shifting. Ensure all cabinet fasteners are tight and the cabinet frames are sturdy. Any necessary repairs to the cabinets should be completed before proceeding with the countertop installation.
Furthermore, ensure the worksite is prepared. This means clearing the area of obstructions, protecting surrounding surfaces with drop cloths or plastic sheeting, and gathering all necessary tools and materials. Having everything readily available will streamline the installation process and minimize downtime.
Installation Process: A Step-by-Step Guide
The installation process varies slightly depending on the countertop material and complexity of the project. However, the fundamental steps remain consistent. This section outlines the general procedures for installing countertops, with specific notes for different materials where applicable.
Dry-fitting the countertop is a crucial step to ensure a proper fit before applying any adhesive. Carefully position the countertop on the cabinets and check for any gaps or inconsistencies. Use shims, if necessary, to fine-tune the placement and ensure the countertop sits flush against the walls and cabinets. If the countertop consists of multiple pieces that need to be joined, dry-fit them together to verify the alignment and seam quality. Mark any areas that require adjustments, such as trimming or sanding, before proceeding.
Once the dry-fit is satisfactory, prepare the surface for adhesion. Clean both the underside of the countertop and the top of the cabinets to remove any dust, debris, or grease. Use a degreasing cleaner if necessary. For some materials, such as laminate, a thin coat of contact adhesive may be applied to both surfaces to improve adhesion. Allow the adhesive to dry to a tacky consistency before proceeding.
Applying adhesive is a critical step that requires precision and attention to detail. The type of adhesive used will depend on the countertop material and the substrate. Construction adhesive is commonly used for attaching countertops to cabinets. Apply a generous bead of adhesive along the perimeter of the cabinet tops and in a serpentine pattern across the remaining surface. Be careful not to apply too much adhesive, as this can squeeze out and create a mess. For joining multiple countertop pieces, use a seam adhesive specifically designed for the material. Follow the manufacturer's instructions for application and curing time.
Carefully position the countertop onto the cabinets, aligning it with the marks made during the dry-fitting process. Once the countertop is in place, apply pressure to ensure good contact with the adhesive. Use clamps or weights to hold the countertop in place while the adhesive cures. The curing time will vary depending on the type of adhesive used, but typically it is recommended to allow at least 24 hours. During this time, avoid placing any heavy objects on the countertop.
After the adhesive has fully cured, remove any excess adhesive with a scraper or solvent. Apply a bead of caulk along the backsplash and any seams to seal the countertop and prevent water damage. Use a high-quality, mildew-resistant caulk that is specifically designed for kitchen or bathroom applications. Smooth the caulk with a wet finger or a caulking tool for a professional finish. Any necessary plumbing connections for sinks or faucets can be installed at this stage, following the manufacturer's instructions and local plumbing codes.
Finishing Touches: Ensuring a Professional Result
The final stages of countertop installation involve addressing any imperfections, ensuring a clean and polished appearance, and implementing protective measures to prolong the countertop's lifespan.
Grout, when relevant, is an important finishing element, especially when dealing with tile countertops. Proper grout application involves filling the spaces between the tiles completely, ensuring a uniform color and a smooth surface. After the grout has dried, excess grout residue should be carefully removed with a damp sponge. A grout sealer can be applied to protect the grout from staining and water damage.
Sealing is an essential step for certain countertop materials, such as granite, marble, and wood. Sealing helps to protect the countertop from stains, scratches, and water damage. The type of sealant used will depend on the countertop material. Follow the manufacturer's instructions for application and reapplication frequency. Regularly resealing the countertop will help to maintain its appearance and prolong its lifespan.
Proper cleaning and maintenance are crucial for preserving the beauty and longevity of the countertop. Use a mild soap and water solution to clean the countertop regularly. Avoid using abrasive cleaners or scouring pads, as these can scratch the surface. For specific countertop materials, follow the manufacturer's recommendations for cleaning and maintenance. Promptly clean up any spills to prevent staining. Consider using cutting boards and trivets to protect the countertop from scratches and heat damage.
Finally, inspect the entire installation for any imperfections or areas that require further attention. Touch up any paint or caulk as needed. Ensure all appliances are properly installed and functioning correctly. By paying attention to these finishing touches, a professional-looking and durable countertop installation can be achieved.
Installing countertops is a multifaceted project requiring meticulous planning, precise execution, and attention to detail. While the steps outlined above provide a comprehensive guide, it is essential to consult with professionals and follow the manufacturer's instructions for specific materials and products. With careful preparation and diligent work, a stunning and functional countertop can significantly enhance a home.

How To Install Laminate Countertops

How To Install Laminate Countertops Lowe S

How To Install A Kitchen Countertop Buildipedia Diy

How To Install Laminate Countertops The Home

How To Install Laminate Countertops The Home

How To Install Laminate Countertops Step By

How To Install Laminate Countertops

How To Install Laminate Countertops Step By Youtube

How To Install Laminate Countertops Step By

How To Install A Quartz Countertop Ask This Old House Youtube