How To Redo A Bathroom Countertop: A Comprehensive Guide
The bathroom countertop often serves as a focal point within the space. Over time, countertops can become worn, stained, or simply outdated. Instead of undertaking a full bathroom renovation, redoing the countertop presents a cost-effective and less disruptive solution to refresh the overall aesthetic. This article provides a comprehensive guide on how to redo a bathroom countertop, covering various techniques, materials, and considerations for a successful project.
Before embarking on any countertop project, careful planning is crucial. Accurate measurements of the existing countertop are required to ensure the proper dimensions for the new surface. The homeowner needs to consider the sink configuration (undermount, drop-in, or vessel) and the faucet placement. The style of the bathroom, be it modern, traditional, or minimalist, should guide the choice of material and finish. Furthermore, the homeowner must assess the condition of the existing cabinetry and ensure it can adequately support the new countertop.
Safety is paramount throughout the project. Appropriate personal protective equipment (PPE) should be worn, including safety glasses, gloves, and a dust mask or respirator, especially when sanding or working with epoxy resins. Ensure proper ventilation in the bathroom, particularly when using solvents or paints. Disconnect the water supply to the sink before removing any plumbing fixtures. If unfamiliar with plumbing, engage a qualified professional to handle the plumbing aspects of the project.
Preparation and Removal of the Existing Countertop
The first step involves preparing the bathroom for the renovation. Clear all items from the countertop, including toiletries, decorations, and appliances. Cover the floor and any surrounding surfaces with drop cloths or plastic sheeting to protect them from dust and debris. Remove the existing faucet and sink. This usually involves disconnecting the water supply lines and drainpipe. Check the underside of the countertop for any clips or screws securing the sink in place.
The removal process depends on how the existing countertop is installed. Many countertops are attached to the cabinet with screws from underneath. Locate and remove all screws securing the countertop to the cabinet. If the countertop is glued to the cabinet, a putty knife or pry bar may be needed to gently separate the two surfaces. Work slowly and carefully to avoid damaging the cabinets. If the countertop is particularly heavy or unwieldy, enlist assistance to safely lift and remove it.
Once the countertop is removed, inspect the underlying cabinet for any damage or rot. Address any necessary repairs or reinforcements before proceeding. Clean the cabinet surface thoroughly to remove any debris, glue residue, or dust. A clean and stable base is essential for the proper installation of the new countertop.
Resurfacing Techniques and Materials
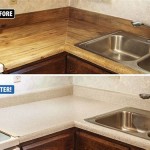
Resurfacing the existing countertop is a viable option for those seeking a cost-effective alternative to complete replacement. Several resurfacing techniques can be employed, each with its own advantages and disadvantages.
Epoxy Resin:
Epoxy resin offers a seamless and durable surface. The process involves applying multiple layers of epoxy resin over the existing countertop, creating a new, glossy finish. Epoxy resins are available in a wide range of colors and designs, including options that mimic the look of natural stone, like granite or marble. The resin can be tinted with pigments and metallic powders to achieve a customized appearance. Proper surface preparation is crucial for successful epoxy application. The existing countertop must be thoroughly cleaned, sanded, and primed to ensure proper adhesion. Multiple thin layers of epoxy resin are typically applied, allowing each layer to cure before applying the next. Epoxy resins are highly durable and resistant to stains and scratches, but they can be susceptible to heat damage.Concrete Overlay:
A concrete overlay provides a modern and industrial aesthetic. The process involves applying a thin layer of concrete over the existing countertop. Concrete overlays can be stained, polished, and sealed to create a variety of finishes. Concrete is a durable and heat-resistant material, but it can be prone to cracking if not properly installed. The existing countertop must be thoroughly cleaned and roughened to provide a good bonding surface for the concrete. A concrete bonding agent is typically applied before the concrete overlay. The concrete is then applied in thin layers, allowing each layer to dry before applying the next. Once the concrete is fully cured, it can be sanded, polished, and sealed to protect it from stains and water damage.Laminate Sheets:
Applying a new laminate sheet is a budget-friendly option for updating a countertop. Laminate sheets are available in a wide range of colors, patterns, and textures, including options that mimic the look of wood, stone, or tile. The existing countertop must be thoroughly cleaned and sanded to provide a smooth surface for the laminate. Contact cement is then applied to both the countertop and the laminate sheet. The laminate sheet is carefully aligned and pressed onto the countertop. A laminate roller is used to ensure proper adhesion and eliminate air bubbles. The edges of the laminate sheet are then trimmed flush with the countertop using a router with a flush-trim bit. Laminate is a relatively durable material, but it is susceptible to scratches and heat damage.Installing a New Countertop
Installing a new countertop offers the opportunity to completely transform the look of the bathroom. Various materials can be used for new countertops, each with its own unique properties and aesthetic appeal.
Granite:
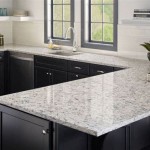
Granite is a natural stone known for its durability and beauty. It is available in a wide range of colors and patterns, making it a versatile choice for any bathroom style. Granite is heat-resistant and stain-resistant, making it a practical choice for a bathroom countertop. However, granite is a porous material and requires regular sealing to prevent stains. Installation of granite countertops typically requires professional assistance due to the weight and complexity of the installation process.Quartz:
Quartz is an engineered stone made from crushed quartz crystals and resin. It offers the look of natural stone with enhanced durability and stain resistance. Quartz is non-porous and does not require sealing. It is available in a wide range of colors and patterns, including options that mimic the look of granite and marble. Quartz countertops are relatively easy to install and maintain. However, they can be susceptible to heat damage.Solid Surface:
Solid surface countertops are made from acrylic or polyester resins. They are non-porous and seamless, making them a hygienic choice for a bathroom countertop. Solid surface countertops are available in a wide range of colors and patterns, and they can be custom-fabricated to fit any bathroom design. They are relatively easy to repair and maintain, but they can be susceptible to scratches and heat damage.Laminate:
Pre-fabricated laminate countertops offer an affordable and easy-to-install option. They are available in a variety of colors and patterns, but they are not as durable or heat-resistant as other countertop materials. Laminate countertops are typically installed using a combination of screws and adhesive.Irrespective of the material selected, accurate measurements are essential for a proper fit. Order the countertop from a reputable supplier, ensuring that it corresponds precisely to the predetermined dimensions. Before installation, dry-fit the countertop to ensure it fits properly on the cabinet. Adjustments may be necessary to ensure a level and even surface. Apply a bead of silicone caulk along the top of the cabinet to provide a waterproof seal and prevent the countertop from shifting. Carefully position the countertop onto the cabinet and secure it with screws from underneath. Ensure the screws are not over-tightened, as this can damage the countertop.
Finishing Touches and Plumbing Reconnection
After the countertop is installed, the finishing touches are crucial for achieving a polished and professional look. Install the sink and faucet according to the manufacturer's instructions. Ensure the sink is properly sealed to the countertop to prevent water damage. Reconnect the water supply lines and drainpipe, ensuring all connections are tight and leak-free. If unfamiliar with plumbing, engage a qualified professional to handle this aspect of the project.
Apply a bead of caulk along the backsplash and any other areas where the countertop meets the wall. This will provide a waterproof seal and prevent moisture from penetrating behind the countertop. Clean the countertop thoroughly to remove any dust, debris, or fingerprints. Polish the countertop with a suitable cleaner to enhance its shine and luster.
Inspect the finished countertop for any imperfections or areas that need attention. Address any necessary repairs or touch-ups to ensure a flawless finish. Once the countertop is complete, allow it to fully cure before placing any items on it. Follow the manufacturer's instructions for cleaning and maintaining the countertop to ensure its longevity and beauty.
Several factors should be considered when determining the overall cost of redoing a bathroom countertop. The cost of materials varies significantly depending on the type of material selected. Granite and quartz are generally more expensive than laminate or solid surface. The cost of labor will also vary depending on the complexity of the installation process and the rates charged by local contractors. Resurfacing is generally less expensive than replacing the entire countertop. The final cost will also depend on any additional work that is required, such as plumbing modifications or cabinet repairs.

Paint Bathroom Vanity Countertop Sink So Easy A Piece Of Rainbow

How To Refinish Bathroom Countertops Domestic Blonde

How To Refinish Bathroom Vanity Top With Diy Epoxy Resin Thediyplan

Paint Bathroom Vanity Countertop Sink So Easy A Piece Of Rainbow
:strip_icc()/101922779-2cbc45e123c34827afb4f601723b03ca.jpg?strip=all "How To Paint Bathroom Countertops")
How To Paint Bathroom Countertops

How To Easily Spray Paint Bathroom Countertops My Homier Home

How To Refinish Laminate Counters Made By Marzipan

Paint Bathroom Vanity Countertop Sink So Easy A Piece Of Rainbow

Before And After Bathroom Vanity Transformation With Painted Tile Countertop The Minimal Ish Mama

Er Friendly Diy To Disguise An Ugly Bathroom Countertop Passion
See Also