Attaching Butcher Block Countertop To Cabinets: A Comprehensive Guide
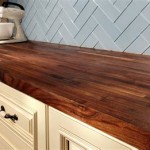
Butcher block countertops are a popular choice for kitchens and other spaces due to their durability, warmth, and natural beauty. Their distinctive wood grain patterns add a touch of rustic charm. When installing a butcher block countertop, attaching it to your cabinets properly is crucial for stability and longevity.
Tools and Materials Needed
Before beginning, gather the necessary tools and materials. This will ensure a smooth and efficient installation process. You will need:
- Butcher block countertop (pre-cut or custom-sized)
- Tape measure
- Level
- Pencil
- Safety glasses
- Work gloves
- Circular saw (for custom cutting, if necessary)
- Jigsaw (for intricate cuts)
- Wood glue
- Construction adhesive (optional)
- Clamps
- Screwdriver or drill with appropriate bits
- Finishing nails or screws
- Countersinking tool (optional)
- Wood filler (for covering screw holes)
- Sandpaper (for smoothing edges and filler)
- Finish (oil, wax, or sealant)
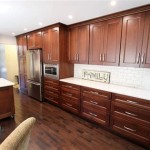
Preparation: Measuring, Cutting, and Positioning
Accurate measurements are essential for a proper fit. Measure the width and depth of your cabinet openings carefully, taking into account any overhang you desire. If necessary, use a circular saw or jigsaw to cut the butcher block to size.
Once the countertop is the right size, position it on the cabinets. Use a level to ensure that the countertop is perfectly flat. Mark the edges of the countertop on the cabinets with a pencil. This will serve as a guide for attaching the countertop.
Installation: Securing the Countertop
There are a few different methods for attaching a butcher block countertop to cabinets.
Method 1: Screwing Directly to the Cabinets
This is a straightforward and common method. You will be attaching the countertop directly to the cabinet framework.
- Begin by applying wood glue along the edges of the countertop where it will meet the cabinets.
- Carefully position the countertop on the cabinets, ensuring that it aligns with the marks you made earlier.
- Using a drill, pre-drill pilot holes through the countertop and into the cabinets. This will prevent splitting the wood.
- Drive screws through the pilot holes into the cabinets. Use finishing nails or screws countersunk below the surface of the countertop for a clean look.
- Use clamps to hold the countertop in place while the glue dries, typically overnight.
Method 2: Using Construction Adhesive
Construction adhesive can provide a strong bond and is particularly useful if the countertop is heavy or if you need to attach it to uneven surfaces.
- Apply construction adhesive to the underside of the countertop, focusing on the edges and areas that will come in contact with the cabinets.
- Position the countertop on the cabinets, aligning it with your markings. Wipe away any excess adhesive immediately.
- Use clamps to hold the countertop in place until the adhesive cures. The drying time will vary depending on the type of adhesive used, so consult the manufacturer's instructions.
- Once the adhesive is cured, you can add a few screws for extra security, if desired.
Method 3: Using a Combination of Glue and Screws
This is a hybrid approach that combines the strength of glue with the secure hold of screws.
- First, apply wood glue to the underside of the countertop along the edges and the areas where it will be attached to the cabinets.
- Position the countertop on the cabinets, aligning it with your markings. Wipe away any excess glue immediately.
- Pre-drill pilot holes through the countertop and into the cabinets.
- Drive screws through the pilot holes into the cabinets, securing the countertop to the cabinets.
- Use clamps to hold the countertop in place while the glue dries, typically overnight.
Finishing Touches
Once the countertop is securely attached, you can finish it to your liking. Sand the edges of the countertop to smooth them out and remove any rough spots. You can use wood filler to cover any screw holes. Sand any filled areas smooth with sandpaper.
Finally, apply a finish to the butcher block countertop. You can use oils, waxes, or sealants. These finishes will protect the wood, enhance its natural beauty, and make it easier to clean. Follow the instructions on the finish product carefully.
Properly attaching your butcher block countertop to cabinets ensures its stability and longevity. With the right tools, materials, and installation techniques, you can create a beautiful and functional countertop that will serve you for many years to come.

How To Install A Butcher Block Countertop Lowe S

How To Install Diy Butcher Block Countertops With Undermount Sink

How To Install Butcher Block Countertops I Screwed Up A Little

How To Install Butcher Block Countertops Sew Woodsy

Installation Tips Bally Block Co

How To Install Butcher Block Counter Top Pro Tips

7 Steps To Butcher Block Wood Countertop Installation

How To Cut Install Butcher Block Countertops From A Z

How To Install A Butcher Block Countertop Lowe S

How To Install Butcher Block Counters Concord Carpenter
See Also