How to Seal A Granite Countertop
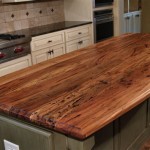
Granite countertops are a popular choice for kitchens and bathrooms due to their durability, aesthetic appeal, and resistance to heat. However, granite, being a natural stone, is porous. This porosity means that liquids and oils can penetrate the surface, leading to staining and discoloration. Sealing granite countertops is a crucial maintenance task that protects the stone and preserves its beauty for years to come. This article provides a comprehensive guide on how to properly seal a granite countertop, ensuring its longevity and preventing damage.
The necessity of sealing depends on the type of granite. Some granites are denser than others, meaning they are less porous and less susceptible to staining. These denser granites might require less frequent sealing, or in some cases, may not need sealing at all. However, it is generally recommended to seal most granite countertops, especially those that are frequently exposed to liquids and oils, such as those in kitchens.
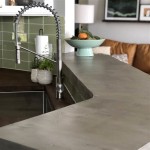
Before embarking on the sealing process, it is essential to gather the necessary materials and tools. These include a granite sealer, clean microfiber cloths, a spray bottle or applicator pad, and appropriate personal protective equipment (PPE) such as gloves. The choice of sealer depends on the type of granite and the desired level of protection. Ensure the selected sealer is specifically designed for natural stone and compatible with granite.
Preparing the Granite Surface
Proper preparation is paramount to achieving a successful and long-lasting seal. The first step is to thoroughly clean the granite countertop. This involves removing any existing dirt, grime, oils, or residues. Use a pH-neutral stone cleaner specifically formulated for granite. Avoid using abrasive cleaners, as these can scratch or damage the surface. Similarly, avoid using acidic or alkaline cleaners, as they can etch the stone.
Apply the cleaner to the countertop according to the manufacturer's instructions. Typically, this involves spraying or wiping the cleaner onto the surface and allowing it to dwell for a few minutes. Then, use a clean, damp microfiber cloth to wipe away the cleaner. Rinse the cloth frequently to ensure that you are effectively removing the dirt and grime. For stubborn stains or residues, you may need to repeat the cleaning process.
After cleaning, it is crucial to ensure that the countertop is completely dry. Any moisture trapped beneath the sealant can hinder its effectiveness and potentially lead to problems like discoloration or mold growth. Allow the countertop to air dry for at least 24 hours. Using a fan to circulate air can expedite the drying process. Alternatively, you can use a clean, dry microfiber cloth to thoroughly dry the surface, ensuring that no water remains in the seams or crevices.
Once the countertop is clean and dry, inspect it for any existing damage, such as chips, cracks, or stains. Addressing these issues before sealing will ensure a more uniform and aesthetically pleasing result. Minor chips can be repaired with a granite repair kit. Cracks may require professional repair. Stains should be treated with a granite stain remover specifically formulated for the type of stain present.
Applying the Granite Sealer
With the countertop properly prepared, the next step is to apply the granite sealer. Before applying the sealer to the entire surface, it is recommended to test it in an inconspicuous area, such as under a cabinet or near the backsplash. This will allow you to assess the sealer's effect on the granite's appearance and ensure that it does not cause any discoloration or other undesirable effects. Follow the manufacturer's instructions for the test application.
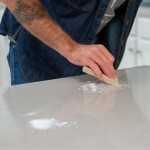
Once you are satisfied with the results of the test application, you can proceed to apply the sealer to the entire countertop. Begin by carefully reading the sealer's instructions, as application methods and drying times can vary between different products. Generally, granite sealers are applied in thin, even coats using a spray bottle or an applicator pad. A spray bottle provides a more uniform application, while an applicator pad allows for more precise control.
When spraying the sealer, hold the bottle approximately 6-8 inches from the countertop surface and spray in a sweeping motion, ensuring that the entire surface is evenly coated. Avoid oversaturating the surface, as this can lead to a buildup of sealant and a sticky or streaky finish. When using an applicator pad, apply the sealer to the pad and then wipe it onto the countertop in a smooth, even motion. Overlap each stroke slightly to ensure complete coverage.
Pay particular attention to the edges and seams of the countertop, as these areas are more prone to staining and water damage. Apply a generous amount of sealer to these areas, ensuring that they are thoroughly saturated. Be careful not to get any sealer on adjacent surfaces, such as cabinets or walls. If you do, wipe it off immediately with a clean, damp cloth.
After applying the first coat of sealer, allow it to dwell on the surface for the recommended amount of time, typically 5-10 minutes. This allows the sealer to penetrate the pores of the granite. After the dwell time, wipe off any excess sealer with a clean, dry microfiber cloth. This is crucial to prevent a sticky or hazy finish. Some sealers may require a second coat for optimal protection. If so, repeat the application process, following the manufacturer's instructions.
Curing and Maintaining the Seal
After applying the sealer, it is essential to allow it to cure properly. Curing refers to the process by which the sealer hardens and bonds to the granite surface. The curing time can vary depending on the type of sealer and environmental conditions, but it typically ranges from 24 to 72 hours. During the curing period, avoid using the countertop or exposing it to liquids or oils. Place signs to remind household members of the curing timeframe.
Once the sealer has fully cured, the granite countertop is ready for use. However, regular maintenance is necessary to preserve the integrity of the seal and prevent staining. Clean the countertop regularly with a pH-neutral stone cleaner. Avoid using abrasive cleaners, acidic cleaners, or alkaline cleaners, as these can damage the sealer and the granite itself. Wipe up spills immediately, especially those containing acidic substances like lemon juice or vinegar.
To further protect the countertop, consider using cutting boards when preparing food and placing coasters under drinks. This will help prevent scratches and stains. Avoid placing hot pots or pans directly on the countertop, as this can damage the sealer and potentially crack the granite. Use trivets or hot pads to protect the surface from heat.
The frequency with which granite countertops need to be resealed depends on several factors, including the type of granite, the type of sealer used, and the level of use. A simple water test can help determine if the countertop needs to be resealed. Pour a small amount of water (about 3 inches in diameter) onto the countertop and let it sit for 15-20 minutes. If the water beads up, the sealer is still effective. If the water soaks into the granite, it is time to reseal.
Generally, granite countertops should be resealed every 1-3 years. However, high-use areas, such as those around the sink or stovetop, may require more frequent sealing. By following these guidelines, one can effectively seal a granite countertop, protecting it from stains, damage, and discoloration, and preserving its beauty for years to come. Regular maintenance and timely resealing will ensure that the countertop remains a durable and attractive feature in any kitchen or bathroom.

How To Treat Seal Granite Marble Countertops Lesher

Best Granite Countertop Sealer Denver Co

How To Seal Granite Countertops

How To Seal Granite Countertops Angi

Sealing Granite Countertops Precision

How To Clean Seal And Polish Granite Countertops Pro Housekeepers

See How A Stone Sealing And Seam Repair Made This Granite Countertop In Mesa Az Shine Again

The Steps Of Sealing Granite Countertops Seal Team One

How A Sealer Protects Your Granite Countertops

How To Seal Granite Countertops 13 Steps With Pictures