How To Install Countertops On Cabinets
Installing countertops is a crucial step in any kitchen or bathroom renovation. It involves securing a flat, durable surface onto existing cabinetry, providing a functional and aesthetically pleasing workspace. The installation process requires careful planning, precise measurements, and adherence to specific techniques to ensure a professional-looking and long-lasting result. This article provides a detailed guide on how to install countertops on cabinets, covering essential tools, materials, and procedural steps.
Before commencing the installation, it is essential to thoroughly inspect the cabinets to ensure they are level and stable. Any discrepancies in the cabinet structure must be addressed before proceeding with countertop installation. Leveling can be achieved by using shims placed under the cabinet bases. A stable foundation is paramount for preventing future countertop cracking or shifting.
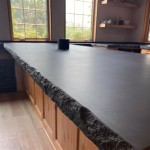
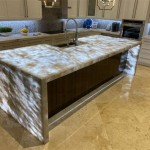
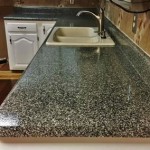
Furthermore, consider the type of countertop material being used. Different materials, such as granite, quartz, laminate, or solid surface, require specific installation techniques and adhesives. Understanding the properties of the chosen material is critical for selecting the appropriate installation methods and ensuring a successful outcome.
Preparing the Cabinets for Countertop Installation
The first key step in installing countertops is preparing the underlying cabinets. This involves a thorough inspection and any necessary adjustments to guarantee a level and stable surface for the countertop to rest on. A level surface is non-negotiable; even minor inconsistencies can lead to problems down the line, such as countertop cracking, sealant failure, or uneven weight distribution.
Begin by using a level to check the tops of all cabinets. Place the level across different points to identify any high or low spots. If discrepancies are found, use shims made of wood or plastic to bring the cabinets into alignment. Slide the shims under the cabinet bases until the level indicates a perfectly flat surface. Ensure the shims are securely in place and do not protrude beyond the cabinet edges.
In addition to leveling, inspect the cabinet structure for any signs of damage or weakness. Tighten any loose screws and reinforce any areas that appear unstable. If there are gaps or voids between the cabinets and the wall, fill them with wood filler or caulk to create a solid and continuous surface. This will prevent the countertop from flexing or shifting over time.
Another essential preparation step is measuring the cabinet base accurately. This will ensure the countertop fits snugly and provides adequate overhang as required. Use a measuring tape to determine the length and depth of the cabinets, taking into account any overlaps or variations in the design. Double-check all measurements to avoid errors and ensure precise countertop dimensions.
Finally, clean the top of the cabinets thoroughly to remove any dust, debris, or grease. This will provide a clean and adhesive-friendly surface for the countertop installation. Use a mild detergent and water to scrub the cabinet tops, followed by a thorough rinse and dry.
Applying Adhesive and Setting the Countertop
Once the cabinets are properly prepared, the next step is to apply adhesive and carefully set the countertop in place. The type of adhesive used will depend on the countertop material and the manufacturer's recommendations. For granite and quartz countertops, a silicone-based adhesive is typically used, while laminate and solid surface countertops may require a different type of adhesive. Always consult the countertop manufacturer's instructions for the appropriate adhesive.
Apply a generous bead of adhesive along the top edges of the cabinets where the countertop will make contact. Ensure the entire surface is covered with adhesive, but avoid applying too much, which can squeeze out and create a mess. Use a caulk gun or other dispensing tool to apply the adhesive evenly and consistently.
Carefully lift the countertop and position it over the cabinets. Align it precisely with the measured marks and ensure it is centered and square. Lower the countertop slowly and gently onto the adhesive, taking care to avoid any sudden movements or shifts. Once the countertop is in place, apply firm and even pressure across the entire surface to ensure good adhesion.
Use shims or spacers to maintain a consistent gap between the countertop and the wall, if necessary. This gap will be filled with caulk later to create a watertight seal. Check the countertop for levelness and adjust the shims as needed to achieve a perfectly flat surface. Once the countertop is level and in place, allow the adhesive to dry completely according to the manufacturer's instructions. This typically takes between 24 and 48 hours.
After the adhesive has dried, remove any excess adhesive that may have squeezed out from under the countertop. Use a scraper or utility knife to carefully trim away any excess adhesive, taking care not to damage the countertop or cabinets. Clean the area with a damp cloth to remove any remaining residue.
Securing and Finishing the Countertop Installation
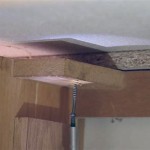
While adhesive is the primary means of securing the countertop, additional fasteners may be required for certain materials or installations. For example, granite and quartz countertops may require the use of mounting brackets or screws to provide extra support and prevent movement. Laminate and solid surface countertops may need to be secured with screws or staples to prevent warping or flexing.
If using mounting brackets, attach them to the underside of the countertop and the cabinet frame using screws. Ensure the brackets are evenly spaced and securely fastened to provide maximum support. If using screws or staples, pre-drill pilot holes to prevent splitting the countertop material. Drive the screws or staples in carefully, taking care not to overtighten them. Countersinking the screws can allow for a smoother finish after they are installed.
Once the countertop is securely fastened, the final step is to caulk the seams and edges to create a watertight seal and improve the overall appearance of the installation. Use a high-quality silicone caulk that is specifically designed for countertops. Apply a bead of caulk along the seam between the countertop and the wall, as well as any other gaps or joints.
Smooth the caulk with a wet finger or a caulk smoothing tool to create a clean and professional finish. Wipe away any excess caulk with a damp cloth. Allow the caulk to dry completely according to the manufacturer's instructions. This typically takes between 24 and 48 hours. Inspect the caulked seams and edges for any gaps or imperfections. Apply a second coat of caulk if necessary to ensure a watertight seal.
After the caulk has dried thoroughly, clean the countertop with a mild detergent and water. Remove any dust, debris, or fingerprints. Polish the countertop with a soft cloth to enhance its shine and luster. Inspect the entire installation for any flaws or imperfections. Address any issues promptly to ensure a long-lasting and satisfactory result.
Installing countertops on cabinets is a challenging but rewarding project. With careful planning, precise measurements, and adherence to these guidelines, achieving a professional-looking and functional countertop installation is possible. Remember to prioritize safety and consult with professionals when dealing with heavy materials or complex installations.
Following safety precautions is important. Wear safety glasses when cutting or drilling materials. Use gloves when handling adhesives and sealants. Ensure proper ventilation when working with solvents or chemicals. Enlist assistance when lifting heavy countertops to prevent injuries. Disconnect power to electrical outlets before working near them.
Regular maintenance can prolong the life of the countertop. Clean spills immediately to prevent staining. Use cutting boards to protect the surface from scratches. Avoid placing hot pots or pans directly on the countertop. Apply sealant or polish periodically to maintain the countertop's luster and water resistance.
By following these guidelines and taking the necessary precautions, achieving a successful and long-lasting countertop installation is within reach.

How To Install Laminate Countertops

How To Install Laminate Countertops Step By

How To Install Laminate Countertops Step By

Install A Laminate Kitchen Countertop Rona

How To Install A Kitchen Countertop Buildipedia Diy

How To Install Laminate Countertops The Home

How To Install Laminate Countertops The Home

How To Install Laminate Countertops Step By

How To Install Countertop On Kitchen Cabinets

How To Install Laminate Countertops The Home
See Also